

Komputer, server, dan gateway
Mengirim data dari program di Linux, macOS, atau Windows: gateway Modbus, PLC dengan PC di sebelahnya, server yang membaca database lain, atau skrip uji. Contoh tersedia dalam Python, JavaScript (Node.js), Go, dan C.
Untuk Raspberry Pi ada panduan tersendiri yang juga menjelaskan cara menjalankannya otomatis: Raspberry Pi.
Ambil kodenya
- Buka perangkat Anda, tab Pengaturan, lalu Koneksi & Integrasi.
- Di Contoh kode, pilih HTTP atau MQTT, lalu tab bahasanya.
- Tekan Salin. Token dan ID perangkat sudah terisi.
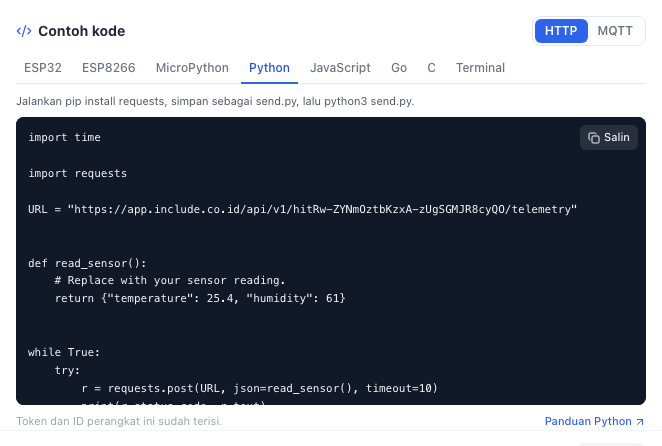
HTTP lebih mudah untuk mulai. MQTT lebih hemat kalau mengirim setiap beberapa detik, dan bisa menerima perintah dari platform. Contoh MQTT di halaman ini memakai port 1883; versi TLS (port 8883) setiap bahasa ada di Contoh kode. Bedanya dijelaskan di Mengirim data lewat MQTT.
Python
Python 3.8 atau lebih baru.
pip install requests      # HTTP
pip install paho-mqtt # MQTTimport time
import requests
URL = "https://app.include.co.id/api/v1/YOUR_DEVICE_TOKEN/telemetry"
def read_sensor():
# Replace with your sensor reading.
return {"temperature": 25.4, "humidity": 61}
while True:
try:
r = requests.post(URL, json=read_sensor(), timeout=10)
print(r.status_code, r.text)
except requests.RequestException as e:
print("send failed:", e)
time.sleep(10)import json
import time
import paho.mqtt.client as mqtt
HOST = "app.include.co.id"
PORT = 1883
DEVICE_ID = "YOUR_DEVICE_ID"
DEVICE_TOKEN = "YOUR_DEVICE_TOKEN"
TOPIC = "includeapps/YOUR_ORG_ID/YOUR_SOLUTION_SLUG/YOUR_DEVICE_ID/telemetry"
def read_sensor():
# Replace with your sensor reading.
return {"temperature": 25.4, "humidity": 61}
def on_connect(client, userdata, flags, reason_code, properties):
print("connected:", reason_code)
client = mqtt.Client(mqtt.CallbackAPIVersion.VERSION2, client_id=DEVICE_ID)
client.username_pw_set(DEVICE_ID, DEVICE_TOKEN)
client.on_connect = on_connect
client.connect(HOST, PORT)
client.loop_start()
while True:
info = client.publish(TOPIC, json.dumps(read_sensor()), qos=1)
info.wait_for_publish(timeout=10)
print("sent:", info.is_published())
time.sleep(10)python3 send.pyDi Windows, ganti python3 dengan py.
JavaScript (Node.js)
Node.js 18 atau lebih baru. HTTP tidak butuh paket tambahan. MQTT butuh paket mqtt:
npm install mqttconst URL = 'https://app.include.co.id/api/v1/YOUR_DEVICE_TOKEN/telemetry';
function readSensor() {
// Replace with your sensor reading.
return { temperature: 25.4, humidity: 61 };
}
async function send() {
try {
const res = await fetch(URL, {
method: 'POST',
headers: { 'Content-Type': 'application/json' },
body: JSON.stringify(readSensor()),
});
console.log(res.status, await res.text());
} catch (err) {
console.error('send failed:', err.message);
}
}
send();
setInterval(send, 10_000);import mqtt from 'mqtt';
const DEVICE_ID = 'YOUR_DEVICE_ID';
const DEVICE_TOKEN = 'YOUR_DEVICE_TOKEN';
const TOPIC = 'includeapps/YOUR_ORG_ID/YOUR_SOLUTION_SLUG/YOUR_DEVICE_ID/telemetry';
function readSensor() {
// Replace with your sensor reading.
return { temperature: 25.4, humidity: 61 };
}
const client = mqtt.connect('mqtt://app.include.co.id:1883', {
clientId: DEVICE_ID,
username: DEVICE_ID,
password: DEVICE_TOKEN,
});
client.on('connect', () => {
console.log('connected');
const send = () =>
client.publish(TOPIC, JSON.stringify(readSensor()), { qos: 1 }, err =>
console.log(err ? `send failed: ${err.message}` : 'sent')
);
send();
setInterval(send, 10_000);
});
client.on('error', err => console.error('mqtt error:', err.message));node send.mjsGo
Go 1.21 atau lebih baru. HTTP hanya memakai pustaka standar. Untuk MQTT:
go mod init sensor
go get github.com/eclipse/paho.mqtt.golangpackage main
import (
"bytes"
"encoding/json"
"fmt"
"io"
"net/http"
"time"
)
const url = "https://app.include.co.id/api/v1/YOUR_DEVICE_TOKEN/telemetry"
func readSensor() map[string]any {
// Replace with your sensor reading.
return map[string]any{"temperature": 25.4, "humidity": 61}
}
func main() {
client := &http.Client{Timeout: 10 * time.Second}
for {
body, _ := json.Marshal(readSensor())
res, err := client.Post(url, "application/json", bytes.NewReader(body))
if err != nil {
fmt.Println("send failed:", err)
} else {
reply, _ := io.ReadAll(res.Body)
res.Body.Close()
fmt.Println(res.StatusCode, string(reply))
}
time.Sleep(10 * time.Second)
}
}package main
import (
"encoding/json"
"fmt"
"time"
mqtt "github.com/eclipse/paho.mqtt.golang"
)
const (
broker = "tcp://app.include.co.id:1883"
deviceID = "YOUR_DEVICE_ID"
deviceToken = "YOUR_DEVICE_TOKEN"
topic = "includeapps/YOUR_ORG_ID/YOUR_SOLUTION_SLUG/YOUR_DEVICE_ID/telemetry"
)
func readSensor() map[string]any {
// Replace with your sensor reading.
return map[string]any{"temperature": 25.4, "humidity": 61}
}
func main() {
opts := mqtt.NewClientOptions().
AddBroker(broker).
SetClientID(deviceID).
SetUsername(deviceID).
SetPassword(deviceToken).
SetAutoReconnect(true)
client := mqtt.NewClient(opts)
if t := client.Connect(); t.Wait() && t.Error() != nil {
panic(t.Error())
}
fmt.Println("connected")
for {
payload, _ := json.Marshal(readSensor())
t := client.Publish(topic, 1, false, payload)
t.Wait()
if t.Error() != nil {
fmt.Println("send failed:", t.Error())
} else {
fmt.Println("sent")
}
time.Sleep(10 * time.Second)
}
}go run main.goUntuk dipasang di gateway, buat satu file program: GOOS=linux GOARCH=arm64 go build -o sensor, lalu salin sensor ke gateway.
C
Untuk Linux, termasuk Raspberry Pi dan gateway berbasis Debian. HTTP memakai libcurl, MQTT memakai libmosquitto:
sudo apt install libcurl4-openssl-dev     # HTTP
sudo apt install libmosquitto-dev # MQTT#include <stdio.h>
#include <unistd.h>
#include <curl/curl.h>
#define URL "https://app.include.co.id/api/v1/YOUR_DEVICE_TOKEN/telemetry"
int main(void) {
curl_global_init(CURL_GLOBAL_DEFAULT);
struct curl_slist *headers = curl_slist_append(NULL, "Content-Type: application/json");
for (;;) {
double temperature = 25.4; /* replace with your sensor reading */
double humidity = 61;
char body[128];
snprintf(body, sizeof body, "{\"temperature\": %.1f, \"humidity\": %.0f}", temperature, humidity);
CURL *curl = curl_easy_init();
curl_easy_setopt(curl, CURLOPT_URL, URL);
curl_easy_setopt(curl, CURLOPT_HTTPHEADER, headers);
curl_easy_setopt(curl, CURLOPT_POSTFIELDS, body);
curl_easy_setopt(curl, CURLOPT_TIMEOUT, 10L);
CURLcode rc = curl_easy_perform(curl);
if (rc == CURLE_OK) {
long status = 0;
curl_easy_getinfo(curl, CURLINFO_RESPONSE_CODE, &status);
printf("\nHTTP %ld\n", status);
} else {
fprintf(stderr, "send failed: %s\n", curl_easy_strerror(rc));
}
curl_easy_cleanup(curl);
fflush(stdout);
sleep(10);
}
}#include <stdio.h>
#include <string.h>
#include <unistd.h>
#include <mosquitto.h>
#define HOST "app.include.co.id"
#define PORT 1883
#define DEVICE_ID "YOUR_DEVICE_ID"
#define DEVICE_TOKEN "YOUR_DEVICE_TOKEN"
#define TOPIC "includeapps/YOUR_ORG_ID/YOUR_SOLUTION_SLUG/YOUR_DEVICE_ID/telemetry"
int main(void) {
mosquitto_lib_init();
struct mosquitto *mosq = mosquitto_new(DEVICE_ID, true, NULL);
mosquitto_username_pw_set(mosq, DEVICE_ID, DEVICE_TOKEN);
int rc = mosquitto_connect(mosq, HOST, PORT, 60);
if (rc != MOSQ_ERR_SUCCESS) {
fprintf(stderr, "connect failed: %s\n", mosquitto_strerror(rc));
return 1;
}
mosquitto_loop_start(mosq);
printf("connected\n");
for (;;) {
double temperature = 25.4; /* replace with your sensor reading */
double humidity = 61;
char payload[128];
snprintf(payload, sizeof payload, "{\"temperature\": %.1f, \"humidity\": %.0f}", temperature, humidity);
rc = mosquitto_publish(mosq, NULL, TOPIC, (int)strlen(payload), payload, 1, false);
printf(rc == MOSQ_ERR_SUCCESS ? "sent\n" : "send failed\n");
fflush(stdout);
sleep(10);
}
}cc send.c -lcurl -o send && ./send
cc publish.c -lmosquitto -o publish && ./publishVersi TLS contoh MQTT (port 8883) memeriksa sertifikat server dengan sertifikat sistem di /etc/ssl/certs. Di macOS, pasang libmosquitto dengan brew install mosquitto, lalu ganti baris mosquitto_tls_set di versi itu menjadi:
mosquitto_tls_set(mosq, "/etc/ssl/cert.pem", NULL, NULL, NULL, NULL);Tanda berhasil
| Protokol | Di layar |
|---|---|
| HTTP | 202 {"ok":true} setiap 10 detik |
| MQTT | connected, lalu sent setiap 10 detik |
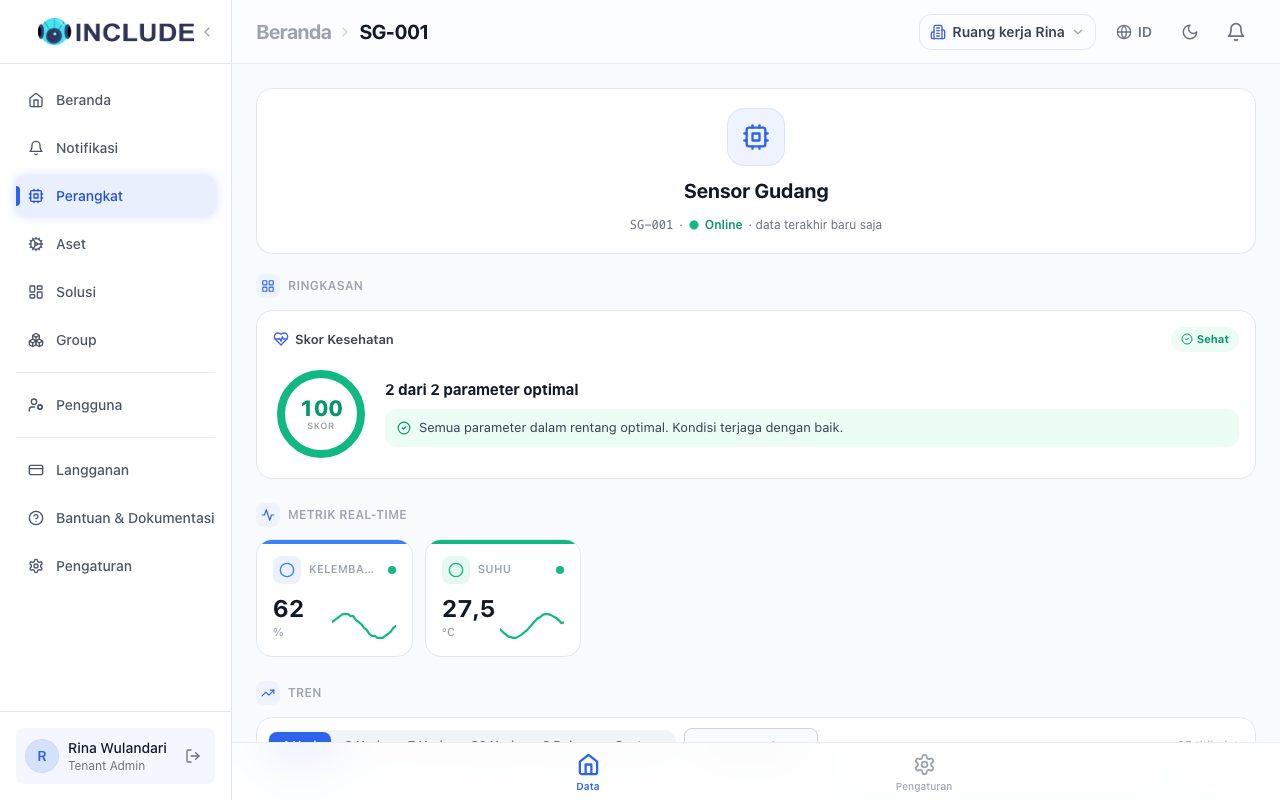
Di INCLUDE, bacaan tampil di halaman perangkat beberapa detik kemudian.
Kalau tidak berhasil
| Pesan | Artinya |
|---|---|
401 | Token salah. Salin ulang dari Koneksi & Integrasi. |
429 | Terlalu sering mengirim. Perbesar jedanya. |
certificate verify failed | Sertifikat sistem komputer itu usang. Perbarui paket ca-certificates. |
MQTT Not authorized atau Bad user name or password | Device ID atau Device Token salah. |
| MQTT tersambung lalu langsung putus | Topik bukan milik perangkat ini, atau Client ID dipakai program lain. |
Lihat juga Data belum masuk.